Friday, November 30, 2012

Crock Pot Potato Soup

As much as I love summer and the chance to play outside with my kids, the cooler weather brings more enjoyment in the kitchen. I love stews and soups, my favorite being potato soup. I have tried many different recipes and really love this one. My kids even ate it and they are very hard to please, especially when it has anything to do with potatoes.
This is the first crock pot potato soup I've tried. With having three kids 3 and under, crock pot recipes are my favorites. I can usually throw everything in the crock pot while my youngest is napping or the kids are eating lunch. This provides a much less stressful supper hour for me and more time to spend with my kids.


Crock pot Ham and Potato Soup from Bohemian Transplant
Ingredients:
7 c. diced potatoes (about 4 medium)
1 c. diced onion (about 1 medium)
1 large carrot, chopped
2 c. ham, diced
5 c. hot water
1 Knorr Chicken Bullion cube (extra large size that makes 1 quart broth or 4 small cubes that make 1 cup each)
1 c. 2% milk
1/2 c. sour cream
Salt and Pepper to taste

Directions:
Add diced potatoes, onion, carrot, and ham to a crock pot. Dissolve chicken bullion in 5 cups hot water, then add this to the crock pot also. Cook on low 7 hours, or high 3 hours. Then add milk and sour cream. Stir and cook an additional 15 minutes. Add salt and pepper to taste. Makes twelve 1-cup servings.If you'd like a thicker soup, just before adding milk and sour cream, remove 2-3 cups of the potatoes and slightly mash, then return the mashed mixture to the crock pot.

Makes 12 Servings (About 1 Cup Per Serving)


Wednesday, November 28, 2012

Felt Christmas Tree for Kids

 Christmas trees and children never mix. Last year I didn't even want to set ours up until a few days before. I was dreading having a two year old and one year old playing with the tree every time I turned around. Well the husband didn't listen and it was up for a few weeks and of course the girls were in it constantly. 

This year my husband set our tree up the weekend before Thanksgiving. We have NEVER had it up so early. Now with three little girls this felt like a nightmare but I couldn't tell my husband no to the tree. The saving grace has been an idea floating around pintrest, a felt tree for your kids to decorate. Genius! 

My Black Friday shopping was at Hancock Fabrics where I purchased the felt for the tree. It costs me a few dollars to make and about a half hour to put together.

What you need 
  •  sharp sissors
  •  1/2 yard of green felt (sold by the yard at fabric stores)
  • 1 sheet of brown for tree trunk
  • variety of felt colors (sold in sheets at craft stores)
  • Tacky glue or craft glue
  • circle to trace for Christmas balls 
  • any other shape to trace for ornaments
 Start with the tree. I folded the felt hotdog style and cut the tree out to the size I wanted. I made my large so that it could grow with my girls. Glue on the piece of brown to make the trunk.

I made a star for the top out of yellow and traced circles on the sheets of felt I had purchased for Christmas balls. The ornaments can be as fancy or simple as you want them to be. Just use your scraps to add embellishments. You can also use glitter glue or puffy paints to make them more fun.

I'm sure pieces will be lost so next year I can easily add different pieces and make my current ones fancier but for this year simple is best. 


Monday, November 26, 2012

DIY: Granola Bars

Our family loves granola bars. They are a great snack and much better than candy bars. My only problem with them is that they have so many added preservatives and other ingredients I haven't heard of before. I want a healthier option for my family. I like to add crasins to sneak in something healthy and add to the flavor since my youngest and I can't have any chocolate. The others get chocolate in their granola bars and of course love it.

Below I have two different recipes. I love the peanut butter recipe and so does my family, but not everyone does or can eat it so I have also included a recipe that I enjoy without peanut butter. 


Peanut Butter Chocolate chip Granola Bars

2 cups crispy rice cereal
1 1/2 cups quick oats
1/2 cup packed brown sugar
1/2 cup honey
1/2 cup peanut butter
1 tsp vanilla
1/4 cup mini chocolate chips

In a large bowl, stir oats and rice cereal together. Set aside. In a small pan bring the brown sugar and honey to a boil, remove from heat and stir in the peanut butter. Let it cool a bit, add the mini chips, and then spread into a buttered 9×13″ cake pan.


Chocolate Chip Granola Bars from Lauren's Latest
Ingredients:
1/4 cup butter
1/4 cup honey
1/3 cup packed brown sugar
2 cups quick cooking oats {not rolled oats!}
1 cup crispy rice cereal
1/2 teaspoon vanilla
2 tablespoons mini chocolate chips
Directions:
In a large bowl, stir oats and rice cereal together. Set aside. In a small pot, melt butter, honey and brown sugar together over medium high heat until it comes to a bubble. Reduce the heat and cook 2 minutes. Pour in vanilla and stir. Pour over dry ingredients and mix well to moisten all ingredients. Pour into lightly greased small jelly roll pan {about 12x8x1} and press out to be about 3/4 inch in thickness. {If your pan isn’t small enough, pack the mixture into one side. You really want to press them down so they stick together.} Sprinkle with mini chocolate chips and press down lightly. Cool on a countertop to room temperature for two hours or until the chocolate chips are set before cutting into bars. Wrap in parchment or plastic wrap and store at room temperature.

Recipe Notes: If your granola bars don’t seem to be staying together when you cut them, you may have made them too thin or you didn’t pack them in tight enough. Stick them in the fridge for 20 minutes and that should help keep them together. {Be sure not to keep them in there too long or else they’ll become super hard!} The next time you make them, try reducing the butter to 3 tablespoons and really packing them down.

Monday, November 19, 2012

DIY: Fruit Snacks

My girls love fruit snacks, but our grocery budget doesn't always allow for extras. I also like to find healthier alternatives with less preservatives and other ingredients I've never even heard of. I came across two different recipes and both are very simple to make. 

The first recipe is the one my girls enjoy the most. It is very similar in texture to the fruit snacks bought in the stores and costs around $1.00 for each batch. Each batch will make close to the same amount as a small box of fruit snacks. 

You will need jello molds which can be found at Walmart or ice cube trays. I use ice cube trays from IKEA that have flower, heart, and star shapes. 


Homemade Jello Fruit Snacks Recipe: from Six Sisters' Stuff
Ingredients:
1 (3 oz) package gelatin, any flavor
2 (.25 oz) envelopes unflavored gelatin
1/3 c. water

Directions:
Sprinkle the gelatin over the water in a small saucepan.  Heat over medium heat and stir until gelatin is completely dissolved.  Pour into molds and allow to set at least 20 minutes.


I love the next recipe. It has real fruit making it much tastier and much healthier alternative.This is more grown up fruit snack that even my picky husband enjoys.

Gummy Fruit Snacks from All Day I Dream About Food

1 cup mixed berries

1/4 cup water

1/2 cup applesauce

1/2 cup fruit juice (apple, cranberry, blueberry, whatever)

2 envelopes gelatin (1 envelope = 2 1/2 tsp)

In a small saucepan over medium heat, combine the berries and water. Bring to a boil and cook until berries are soft, about 5 minutes. Transfer to a blender or use an immersion blender to puree berries until smooth. Return to pot. Add applesauce and return to a boil, then remove from heat, cover and set aside.
In a large bowl, sprinkle gelatin over fruit juice and let stand one minute. Add hot fruit mixture and stir until gelatin completely dissolves, 3 to 5 minutes.
Pour into 8 x 8 inch glass or ceramic baking dish (or into molds, if you want to go that route). Refrigerate until firm, about 3 hours. Cut into blocks or shapes.


Friday, November 16, 2012

Saving Money: Diapers

     About a year and half ago my husband and I had two in diapers and one more on the way. The cost of diapers every month was getting very expensive. We were spending around $80 a month on two and wipes were about $10 (I made my own out of paper towels).
     I had looked into cloth diapers when I first got pregnant but didn't do very well research and decided against it. The sticker price on one cloth diaper is usually what turns people off. Who wants to pay $20 to $30 for one diaper?
     After really looking into cloth diapers, I decided to finally give them a try. Most cloth diaper retailers give you 30 day trial period. This made me feel much better about trying and seeing how I liked them.
     I honestly thought I'd try them just because we needed to save money and I was willing to sacrifice the convenience of disposables. What I found out as I entered into the cloth diaper world is that there are so many options making it very convenient. I also found out that no matter how worn out your diapers are, some one is always willing to buy them from you when you are finished with them.
     So a year and a half later I have spent less than a thousand on diapers for two kids full time. I have tried pocket diapers, All-in-ones, hybrids and flats. My two year old is beginning to potty train so I will begin selling some of my diapers and get some back. The money I put into diapers was completely paid off from uses in about 6 months. I make my own flannel wipes out of scraps so we are saving about $120 a year just on wipes alone. In the end we will save at least $2,000 possible more. It has been worth it and I find myself LOVING my cloth diapers.


If you are curious about cloth diapering check out Changing Diapers Book by Kelly Wells. Click the link on my sidebar to learn more. Almost every question about cloth diapering is in that book. It will give you an idea about each different option and help you decide what is the best option for you.


Wednesday, November 14, 2012

Saving Money: Making your own laundry soap

     If you are like any normal American family, you are trying to find ways to save money. One way to save money is to make your own laundry soap. It is so super easy and saves our family money.
     It takes about 30 minutes from start to finish and for our family of 5 it lasts about 6 months. When I calculated the costs, it comes out to less than $.01 a load! It has been a huge saving. Depending on your brand, most store bought start from around $.20 a load.
     Because of the low sudsing sensation, it works perfectly in HE washers. My clothes have never been so clean. It is gentle on the skin, which is important for our family since the girls and I all have eczema.
  

My Recipe

1 Cup grated soap (I use Felsneptha but you may use any other bar soap. Favorites are ivory and dove)
1 Quart of water
1 Cup washing soda
1 Cup borax
5 gallon bucket

  1. Grate your bar of soap. (I often do this in front of the TV at night when my kids are asleep. One bar of Felsneptha makes two cups so I grate the whole bar and save half for later.)

  2. Fill the 5 gallon bucket about half full with warm water. Add the washing soda and borax and stir until dissolved. 

  3. Boil 1 quart water in a saucepan. Add grated soap a little at a time until all the soap is melted. Add to the 5 gallon bucket. Stir.

  4. Fill the bucket almost to the top. Leave some room in case it is too think and you need to add a little water. (I usually fill it in the shower)

  5. Let sit for several hours. (I continually check on it and stir it)
  6. Stir until it is fairly smooth. (It will be one solid chunk. I use my hands and arms to stir and break it up.)
Now it's ready. All you need is about 1/4 to 1/2 cup per load. 

Let us know what your favorite laundry soap recipe is.

Monday, November 12, 2012

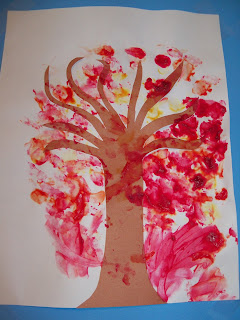
Finger print tree

     My 3 year old has been so curious about the trees changing colors and the leaves falling off. I've tried the best to explain the whole process. A great book to explain is Leaves Fall Down by Lisa Bullard.    
     
 http://images.betterworldbooks.com/140/Leaves-Fall-Down-Bullard-Lisa-9781404863903.jpg 
She has finally entered that stage where she has a question about anything and everything. Those conversations seem to be very interesting and I find myself not always sure what she wants to hear, but I try my best.

     Since my girls love painting, I had my husband pick up finger paints so that we could do some fun projects. I decided we should do some fun fall art projects since it is fall and we've been talking about what fall is
     I came across this activity on All Kids Network and tweaked it to fit my girls. I prepped a tree ahead of time (as I do with all art projects) instead of using their hand and arm. They were so excited  about painting and had been waiting a couple days to do so.

 The kids are supposed to make finger prints with the paint, but after a few minutes of trying to get them to just use their finger tips, I gave up and let them go at it on their own. After about 15 minutes they had their paper covered and their hands full of paint and huge smiles on their faces.


Friday, November 9, 2012

Organizing Your Time: Make yourself a cleaning schudule

     I find the hardest thing to do as a stay at home mom is organizing your time. At the end of the day I am always thinking of more I would have liked to get done.  
     Being a stay at home mom doesn't mean sitting on the couch watching TV and eating chips, like my husband tends to think. My day is spent picking up toys, clothes, and other messes, cleaning, breaking up fights, and trying to keep my girls entertained.
      I found myself waking up with a long of list of things to get done and never feeling like I accomplished anything. I spent my day trying to figure out when I last mopped the floors or cleaned the bathroom.
      One day I came across a cleaning calendar on pintrest. It was just what I was looking for to organinze my cleaning and time. I had to tweak it of course to better fit my needs. You can check out the orginal calendar at Tips and Pix.

My Cleaning Schedule

Morning: Wipe bathroom sinks and counters
         Empty dishwasher
            Put dishes away
             Do one load of laundry

Evening: Load dishwasher
         Hand wash dishes
         Wipe kitchen counters and table
         Quick sweep/spot clean kitchen floor
         Pick up toys

Weekly:
  Monday:    Vacuum and wash bedding
  Tuesday:   Mop bathroom floors and tile in                basement
  Wednesday: Scrub toilets and bath tubs 
  Thursday:  Mop kitchen floors and entry way
  Friday:    Swing Day  

Swing Day Activities:
  1. Wipe down furniture and cabinets 
  2. Scrub oven, microwave, and fridge
  3. Wipe down wall, baseboards, and doors
  4. Clean laundry room
  5. Clean out van
  6. Dusting and windows

     I have found this schedule to be very effective in actually getting things done. I have a few things to do everyday and since everything gets done each week my house stays fairly clean. 
     I love the idea of a swing day. There are things that don't need to be done every week and most activities don't take long and I can do more than one. I can also get my kids involved in washing windows, dusting, and wiping things down.